Postmortem - Ts-depDraw: Dependency explorer
Why is visualising dependencies and projects interesting?
Imagine you’re performing a code review, and you are able to quickly determine how that new piece of code interacts with the project. The graph automatically adds all the edges between nodes, and no hidden dependencies surprise you down the line. This subgraph is then shared with the concerns highlighted to be resolved.
We’re moving into a world where we expect more from our code.
The company SourceGraph has created a “fast, global, semantic code search and cross-reference engine”. Their product allows developers access to “definition information”, “go to definition”, “local and external references”, all in the browser!
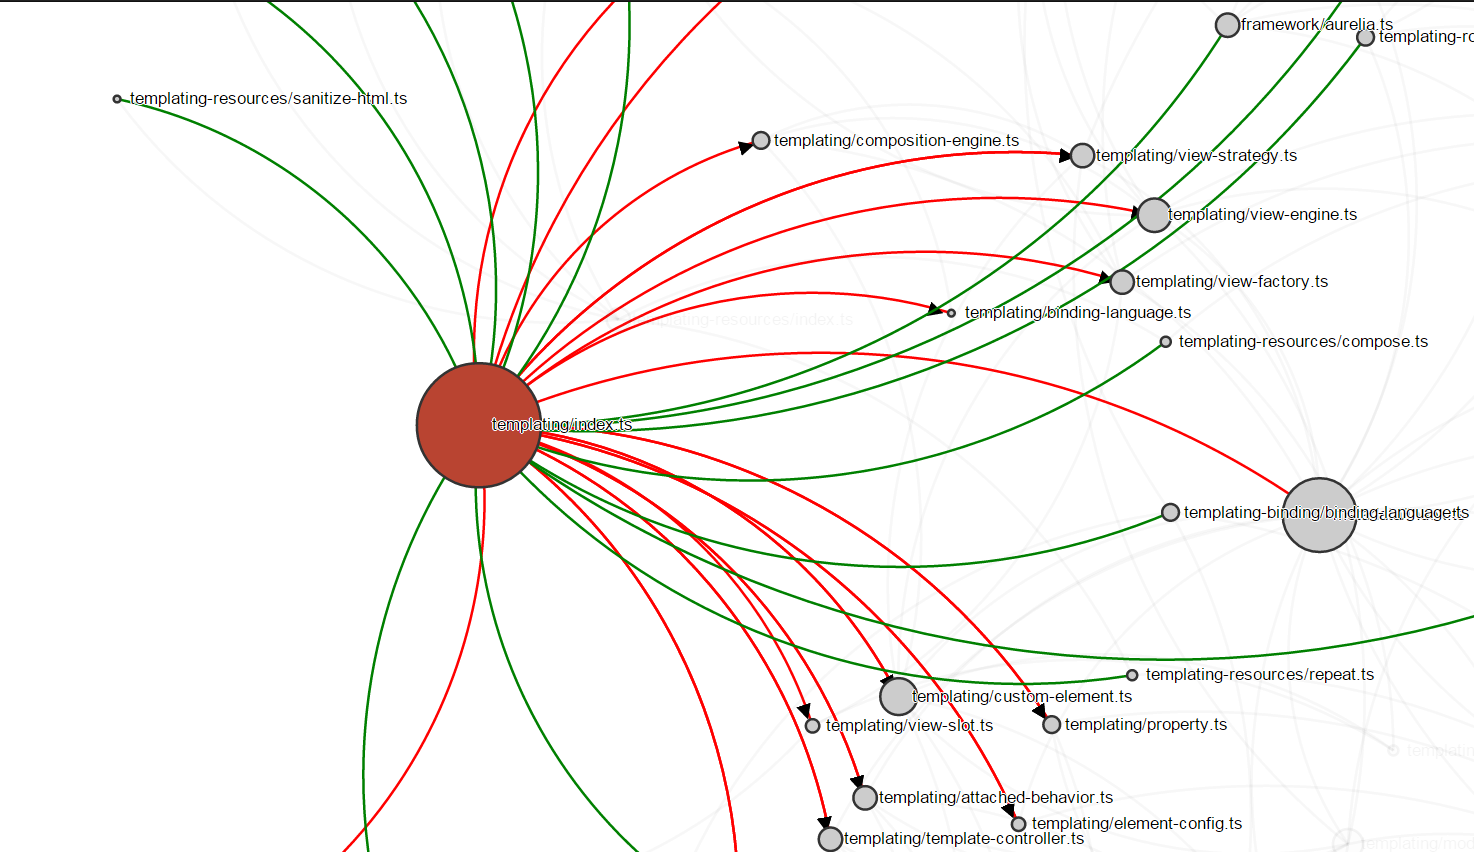
High level architecture of the finished prototype

ts-depdraw architecture
Pre-Beginning
Mid 2016 I expressed an interest in functional programming and a desire to work on a project.
I never anticipated the amount of growth this 10 week project would cause.
Here I’ll share how I created such a large prototype, with only a couple months programming under my belt. If you’re a junior developer, I hope this post will stimulate you to hack on larger projects without fear.
Beginning
I knew almost nothing about what was in store. Yet I did have a title: “Typescript Dependency Visualiser”.
The first meeting was vague and exciting. I would explore the following areas:
- Find the best way to find dependencies in projects.
- Typescript compiler?
- Typescript language service?
- Typescript tsserver that VSCode uses?
- Other?
- Think up a high level architecture that will allow for rapid prototyping.
I discovered that dependency visualisations had already been made. Atom-typescript as well as alm.tools had very well thought out dependency visualisers.
File based dependency view
Dave Cheney’s great post exploring different visualisations of dependencies in Go packages gave me further ideas.
It also showed the challenges of visualising a large package.
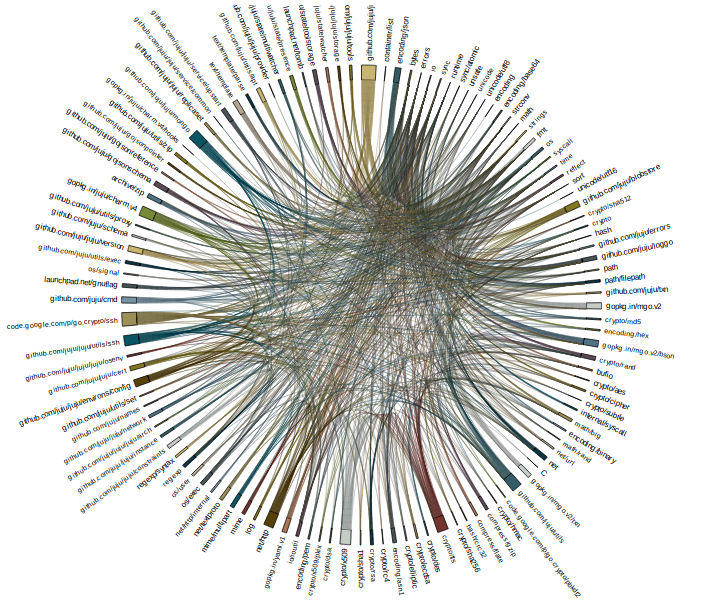
Source: https://dave.cheney.net/2014/11/21/visualising-dependencies
Many dependency viewers are file based or module based. I needed to see if it was possible to draw dependency graphs at a micro level.
Exploring the TypeScript Tsserver
The Tsserver accepts commands as a string (terminated by a newline). A response is then printed back.
Commands look like this, and follow the protocol defined here.
{
    "seq":0,
    "type":"request",
    "command":"open",
    "arguments":{
        "file":"app.ts"
    }
}
During this time I was also exploring the transpiler. Again a couple great posts helped me out: - How to do a straight TS emit) - Investigating Typescript Compiler APIs.
This exploration, although tangental to the tsserver, helped me tokinize files in order to find dependencies later on.
Testing the TypeScript Tsserver
Testing was important to me, especially because I needed a way to see what the tsserver was emitting. This saved me recently when an update added an extra property to the responses.
This post helped me set up child processes, while this post helped me set up my testing environment.
The tests self documented the responses that Tsserver gave for various commands. This form of documentation helped greatly.
Thanks to TypeScript being open source, I was able to see the implementation of the tsserver. This helped greatly, as I could see what compiler functions were being used to get various information. It was a wild ride, because the code contained many techniques and secrets that I wouldn’t have worked out by myself.
Some early Bugs and Errors
- hard coded filepaths caused a problem between operating systems.
- needing to explicitly call TypeScript library files for promiese.
- “exec” vs “spawn” behaviour for processes on different operating systems.
Which quickly lead to a feeling of dread.
After spending a week prototyping the API, I realised the best way to learn what I’d really need is with a MVP (Minimum Viable Product).
Front End Fun
I immediately knew that the user facing interaction needed to be extensible, composable and easily changed. The logic also had to be loosely coupled, and as pure as possible.
These decisions eventually led me to choose.
- React: A great view library.
- Redux: Scratched all my itches, making the UI based on pure actions. (But everything can’t be pure!)
- Rxjs + Redux-Observable: Middleware for side effect actions. (D3js mutations + api calls)
But before I settled on that I also spent one day with Aurelia, and one day with Ember. I also considered Elm, but eliminated it for project maintainability reasons.
Aurelia and Ember had the same problem, which is that they gave too much. I didn’t need routing and I felt like the framework got in the way.
Redux felt natural, and Rxjs allowed very impressive control over side effects and events. Looking back, this four day decision was worth it. I also got practice throwing together a small app in lots of different frameworks / libraries.
At this point I just worked as quickly as possible to throw together the MVP. My API’s naivety showed through quickly, but could be quickly adapted.
Learning D3
“D3.js Essential Training for Data Scientists”, a Lynda course, helped me quickstart D3. The course was fantastic. But, the course didn’t cover graphs.
Graphs turned out to be quite challenging. I really wanted to use an immutable Redux store as my sole point of truth, but it couldn’t be done. The graph information, when loaded into a force layout graph, was mutated. Extra information like x and y coordinates were added. This mutation wasn’t reflected in the Redux store and caused many bugs. Adding and removing nodes was going to be challenging.
The solution
Hashing nodes!
I created a key value map as a second store. The key was a hashed key of the node, and the value was the node itself. The nodes passed into the D3 force directed graph, were references to this store. Therefore all mutations were stored within this key value store. This allowed nodes returned by the API, to be compared with mutated nodes in the graph.
I also had to keep a list of all the node hashes (with indices) as well as edge hashes allowing me to keep tabs on where the nodes were in the force directed graph.
Now I could add and remove nodes! WOOO!!!!!
This solution also removed any need for a graph database.
Logging externally
Nectar Cloud to the rescue. Here I set up a virtual machine and database to store user actions.
I used SSH to configure nginx as a reverse proxy to my Go HTTP server.
After a week I had a virtual machine with two API endpoints that I could use to retrieve the database data, as well as an endpoint for the data to be sent to.
All the extra things I learnt along the way
- Npm packages
- Bundling options like webpack
- Npm scripts / gulp
- Continuous integration
- Typescript
- Setting up virtual machines via the command line
- Dependency injection / inversion of control patterns
- Git commands for branch control
- How difficult dependencies can be in a dynamic language
- Functional reactive programming
- Observables
- React / Redux / Rxjs / D3 / Node / Express
- Go / BoltDB
- Logging
Things I’ll do better next time
- Set up environmental variables for dev and production
- Mock an API and start on the Front End faster
- Spend more time looking at existing solutions
- Test across various operating systems